Activity
Make a Tooth Fairy Tooth Holder

One of the best parts of losing your first baby tooth is putting it under your pillow for the Tooth Fairy. Kids love the story of the little Fairy who flies in at night to collect their teeth and rewards them with a pretty coin, or dollar bill if they're especially lucky. Help keep your child's precious baby teeth safe with this cute tooth-shaped felt pillow that comes with a little pouch that's just the right size for a lost tooth. At night, she can slip it under her pillow and rest easy knowing her little tooth is safe and sound.

Related learning resources

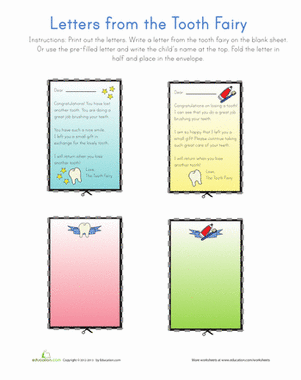
Tooth Fairy Letter
Worksheet
Tooth Fairy Letter
The next time your little one loses a tooth, surprise him with this adorable letter from the Tooth Fairy!
Kindergarten
Worksheet

Letter from the Tooth Fairy
Worksheet
Letter from the Tooth Fairy
Losing a tooth is a special moment for a child! Surprise your little one with this ready-made letter from the Tooth Fairy.
Kindergarten
Worksheet

Tooth Fairy Note
Worksheet
Tooth Fairy Note
Surprise your child with a cute note from the Tooth Fairy! Use the blank one to create a note of your own.
Kindergarten
Worksheet