Activity
How to Demagnetize a Magnet
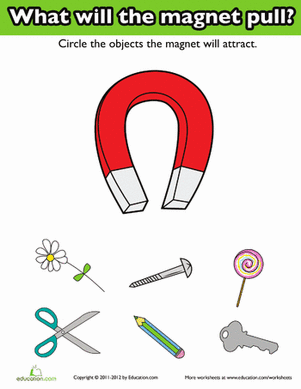
The first thing many kids do when they get home from school is open the refrigerator. Is your refrigerator door covered with cards, photos and papers? You probably already figured out that refrigerator magnets are attracted to the steel in the refrigerator door. Magnets are materials that attract iron (which is what steel is mostly made of), nickel and a couple other metals. A material is said to be magnetic if it acts like a magnet. The atoms within a magnet line up in groups with their north and south ends lined up with Earth’s magnetic pole. When many, many atoms are lined up in the same direction the material creates a magnetic field, which is the space around a magnet where the pull or push forces operate.
Now that we have discussed how your refrigerator magnets work, let’s investigate how to demagnetize a magnet. When we say that magnets can become demagnetized, we mean that they lose their ability to attract metals like iron.
Problem
How Can You Demagnetize a Magnet?
Materials
- Stapler filled with staples
- Grown-up
- Strong magnet
- 4 long iron nails
- Ruler
- Work table or other surface that you can hammer on
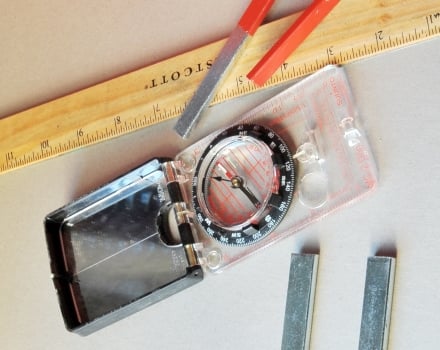
- Magnetic compass (the kind you find direction with)
- Masking or duct tape
- Hammer
- Freezer
- Cookie sheet
- Oven (you can’t use a microwave for this activity)
- Hot mitt
- Tongs
Procedure
- First, you need to make some magnet testers. Ask your grown-up to open and close the stapler several times, without any paper, so several closed staples slide out.
- Next, you want to make some weak magnets out of the iron nails. Hold the nail’s head in one hand, covering at most the first 1 cm of the nail.
- Using your other hand, run the magnet down the nail to the tip. Lift up, and repeat.
- Continue magnetizing the nail for three minutes.
- Test the strength of your newly created magnet. You should be able to pick up at least three closed staples at the tip of the nail. If you can’t, continue magnetizing your nail until you can.
- Using the other nails, create three more weak magnets the same way. Use the staples to confirm that all your nails are about the same strength.
- Put one of your magnetized nails in the freezer for at least an hour.
- Put another one of your magnetized nails in on a cookie sheet in a 350 degree oven for a half hour. Why can’t you use a microwave to heat your nail?
- As you’re waiting for your nails to be heated and cooled, you can test the effect of striking one of your magnetized nails.
- Set your compass on the hammer safe surface and turn it so that the needle points north.
- Lay a magnetized nail adjacent to the compass. The point of the nail should face east.
- Remove the compass, and tape the nail to your surface.
- Ask a grown-up to hammer the nail on the table twenty times.
- Now, see how many staples the nail can pick up.
- This time, lay another magnetized nail so that the needle points north.
- Remove the compass, and tape down the nail.
- Ask a grown-up to hammer the nail on the table twenty times.
- See how many staples this second nail can pick up.
- Record your results in a data table.
|
Demagnetizer |
Number of staples picked up |
|
Newly magnetized nail - control |
|
|
Hammer East/ West |
|
|
Hammer North/ South |
|
|
Hot Oven Nail |
|
|
Frozen Nail |
|
|
Other idea 1 |
|
|
Other idea 2 |
|
- Asking your grown-up to use the hot mitt and tongs see how many staples the hot magnetized nail can pick up.
- Remove the nail from the freezer, and immediately test how many staples it can pick up.
Results
Your results will vary depending on the strength of the magnet you are creating magnets with, and how strong you make your nail magnets. Both of the hammered nails should have been noticeably less magnetic. The one you pointed east before hammering may have shown less magnetism than the one you pointed north. The nail you put in the oven should have lost some of its magnetism, while the one you put in the freezer will not have lost any strength at all.
Why?
Metals have lots of interesting properties! The reason the hammered nails showed less magnetism is because the hammering wrecked the orderly arrangement of atoms. The nail facing east may have been even more demagnetized than the one facing north because its atoms could not reorient themselves to the Earth’s magnetic poles. Remember—the earth itself is a giant magnet!

Heating the nail in the oven increased the kinetic energy of the nail’s iron atoms. That means the atoms were free to move around more, resulting in a messy arrangement after heating. Remember—iron atoms should all be facing the same direction to create a magnetic field. If a metal is heated to a high enough temperature, it reaches its Curie point, at which it loses all of its magnetism. On the other hand, putting the nail in the freezer decreases the kinetic energy of its atoms, making sure the atoms stay put and the nail retains its magnetism.
Going Further
Think of some other ways to demagnetize a nail. Maybe you could drop a magnetized nail several times (as refrigerator magnets sometimes do). Perhaps you could place a nail in boiling water or let it rust a bit. Have fun, but be careful!
Education.com provides the Science Fair Project Ideas for informational purposes only. Education.com does not make any guarantee or representation regarding the Science Fair Project Ideas and is not responsible or liable for any loss or damage, directly or indirectly, caused by your use of such information. By accessing the Science Fair Project Ideas, you waive and renounce any claims against Education.com that arise thereof. In addition, your access to Education.com's website and Science Fair Project Ideas is covered by Education.com's Privacy Policy and site Terms of Use, which include limitations on Education.com's liability.
Warning is hereby given that not all Project Ideas are appropriate for all individuals or in all circumstances. Implementation of any Science Project Idea should be undertaken only in appropriate settings and with appropriate parental or other supervision. Reading and following the safety precautions of all materials used in a project is the sole responsibility of each individual. For further information, consult your state's handbook of Science Safety.
Related learning resources