Activity
The Rings of Saturn: A Scale Model

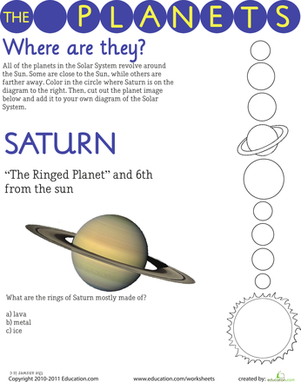
Saturn is the sixth planet from the Sun and it’s the second-largest planet in the solar system, behind Jupiter. Unlike Earth, Saturn is a gas giant that is mostly like hydrogen and helium instead of solid matter.
In 1610, during Galileo’s first observations of the night sky with a telescope, he was puzzled by Saturn’s surroundings. Many hundreds of years later, the space explorers Voyager 1 and 2 took pictures of Saturn’s rings. These closer images revealed that Saturn’s rings are very complex and have many small rings and spaces between them.
What are the rings, and why are they there? Inside Saturn’s rings are particles large and small. Some objects inside the rings are as large as buildings, while others could fit in the palm of your hand. Some are even too small to be seen with the naked eye. Most of these particles are made of water ice, dust, and rock. It’s likely that all of this debris came together when the pull of Saturn and its moons moved comets and meteorites into the area.
Much of the structure of the rings is likely held in place by the gravitational forces from Saturn’s moons, but scientists aren’t completely sure how the rings hold together. There are many mysteries connected to the rings, including the fact that the rings orbit at different speeds.
Problem
Create a scale model of Saturn and its rings.
If you're looking for a challenge and want to exercise some math skills, tackle the advanced procedure to determine how to make a scale model of Saturn's rings on your own! If you're just looking to build a really cool model, skip down to the second procedure.
Materials
- Small Styrofoam ball (about 1.5 inches in diameter)
- CD
- Permanent markers
- 3 colors of sequins or glitter
- Glue
- Dowel
- Modeling clay
- Paper
- Protractor
- Compass
- Ruler
Advanced Procedure:
- The table below illustrates the distances of Saturn's brightest rings. You're going to make a scale model of Saturn's rings in the space that you have available on your CD. How can you use math to achieve accurate proportions of the Saturn's rings on your CD? Hint: Use the metric side of your ruler to take your measurements and use centimeters or millimeters as your units rather than inches.
| Ring | Distance (in miles) |
| D | 4,600 |
| C | 10,000 |
| B | 15,000 |
| Cassini Division | 2,000 |
| A | 9,000 |
| F | 500 |
- Add a column to the table and write the proportional ring measurements you found.
- Use glue and different colors of glitter to define the separate rings.
- Cut the Styrofoam ball in half. You can paint the ball if you'd like--the planet is usually depicted in shades of orange, brown, and gray. Glue the halves on either side of the CD.
- Insert the dowel into the bottom of the planet, and use the modelling clay and protractor to position it at a 27 degree angle from vertical.

Procedure
- Cut your foam ball through the middle.
- Place half of the foam ball on the CD and draw a circle around it using a permanent marker. Don’t put any glitter into this middle section. You’ll glue the ball to it later.
- There are many different rings of Saturn, and many of them are very tiny. In this activity, you’ll place Saturn’s largest rings on the white card using the glitter and the sequins.
- The rings of Saturn don’t go in alphabetical order. You’ll begin with the D ring. The D ring is 4600 miles across. Mark a point that is about 3 mm from where you outlined the planet. Use a compass to help you draw a circle that is 3 mm thick. Place white glue inside this area and sprinkle one color of sequins or glitter on the glue. Let it dry.
- Next you will make the C ring. The C ring is larger than the D ring. In real life, it is over 10,000 miles wide. In your model, use your ruler and compass to create a circle that’s about 7 mm thick. Place white glue inside this ring and sprinkle sequins on the glue. Let it dry.
- Continue creating the rings in the same process. The B ring is quite large—over 15,000 miles across in real life. So, the next circle should be 1 cm thick.
- Between the B ring and the rings that are further out, there is a large division called the Cassini Division. The divisions are spaces that look like dark voids, caused by the gravitational pull of Saturn’s moons. In this case, the moon Mimas is causing a large gap between the rings. Use your permanent marker to make a 2 mm black line to show the space between the rings.
- After the division there are several rings that are further away from the planet. The A ring is just over 9000 miles wide. Make a circle that is 5 mm thick. It has a gap 2/3 of the way across the width of the ring. Make a thin black circle here to show the division, and then add white glue and glitter to the rest of the A ring.
- On the outside of the rings, draw another black line about 2 mm thick.
- The last ring we’ll create is the F ring, and it is very tiny in comparison to the other rings. Leave a small space after the last black line. A sliver of the shiny CD will serve as our F ring. Color the rest of the CD black. This model doesn’t show all of the rings of Saturn. Why not? Well, many of them are very small compared to the larger rings: they are less than 100 miles across and would be hard to show on your diagram. The G and F rings extend far out from Saturn. While the G ring is only 5000 miles wide, the E ring is nearly 200,000 miles across. If you created an E ring, it would need to extend 25 cm out from the G ring!
- When the glitter and other decorations have dried, glue the top of the ball to the CD. When that is dry, glue the bottom of the ball to the bottom of the CD. When everything has dried, place a dowel into the bottom of the Styrofoam ball and position it at a 27 degree angle. Use your protractor to find the angle.
Going Further
Want to extend your outer space exploration? Research the locations of Saturn’s different moons and the locations of the gaps in the rings. Are certain moons responsible for certain gaps? How do you think the moons, ice, dust and rock interact to form different rings and different gaps?
Education.com provides the Science Fair Project Ideas for informational purposes only. Education.com does not make any guarantee or representation regarding the Science Fair Project Ideas and is not responsible or liable for any loss or damage, directly or indirectly, caused by your use of such information. By accessing the Science Fair Project Ideas, you waive and renounce any claims against Education.com that arise thereof. In addition, your access to Education.com's website and Science Fair Project Ideas is covered by Education.com's Privacy Policy and site Terms of Use, which include limitations on Education.com's liability.
Warning is hereby given that not all Project Ideas are appropriate for all individuals or in all circumstances. Implementation of any Science Project Idea should be undertaken only in appropriate settings and with appropriate parental or other supervision. Reading and following the safety precautions of all materials used in a project is the sole responsibility of each individual. For further information, consult your state's handbook of Science Safety.
Related learning resources