Activity
How to Make an Ethernet Cable

Most young people today have grown up using the Internet for school and fun—but they don’t always understand how it works. Here's an activity to get your teenager thinking about how the tool she uses every day for communication, homework assignments, or entertainment operates. By assembling an Ethernet cable of her own, your child can learn more about electronics and Internet technology in a hands-on way.
Related learning resources

Cable Car Coloring Page
Worksheet
Cable Car Coloring Page
Color in this charming cable car using crayons or colored pencils, and your imagination!
1st Grade
Worksheet

How to Make an Anemometer
Activity
How to Make an Anemometer
Learn how to make an anemometer with step-by-step instructions in this cool science fair project idea for 4th grade.
4th Grade
Science
Activity
How to Make an Origami Envelope
Worksheet
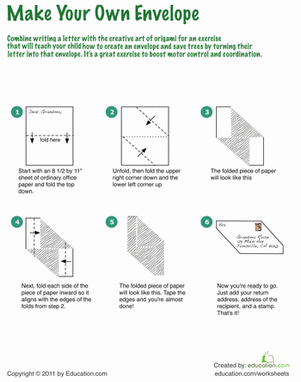
How to Make an Origami Envelope
Have you ever wondered how to make an origami envelope? Well then this worksheet is for you! Write a letter then make it into its own envelope!
3rd Grade
Worksheet